Setting up Port Forwarding for a Dahua NVR
By Administrator on May 27, 2025
BeginnerSetting up Port Forwarding for a Dahua NVR
 Ports are usually closed in a router/modem to help prevent unauthorised access to a network. Opening ports on the router/modem may decrease the overall security of the network. This is an advanced article, If you aren't sure, contact an IT professional or lodge a ticket for further assistance.
 NEVER leave the default or use a simple password on your NVR if you are utilising port forwarding
Overview
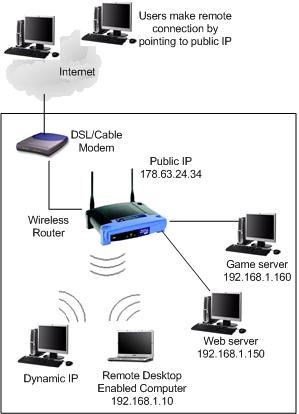
Port forwarding is a feature of network routers that allows specific communication ports to be directed to devices on an IP network, such as a computer, DVR, or IP camera. In the case of CCTV equipment, it allows the user to remotely view and control the equipment. Every router or modem is different, follow the step by step instructions and the instructions your manufacturers hardware to setup port forwarding, or try portforwad.com to search for your routers settings.
Prerequisites
- Network Video Recorder
- Connection to the internet
- Access to the router(s) and/or modem
- A computer that can access the network
Video Instructions
<iframe class="ql-video" frameborder="0" allowfullscreen="true" src="https://www.youtube.com/embed/8zO9K0Kob5k?" height="360" width="640"></iframe>
Step by Step Instructions
1. Login to your NVR via the Web Interface
2. Login with your credentials
If these are the default credentials, change them before activating port forwarding.
NEVER leave the default or use a simple password on your NVR if you are utilising port forwarding
3. Under, Main Menu -> Setup -> TCP/IP Change the IP Camera to, "Static" if the camera is currently set to, "DHCP" and make sure to add it to add it as a static IP on your router.
8. Open another tab and enter the, "Gateway" address listed under your NVR's Network settings. Example: 192.168.1.1, 192.168.0.1, 10.0.10.1
9. Login to your gateway and locate the, "Port Forwarding" section.
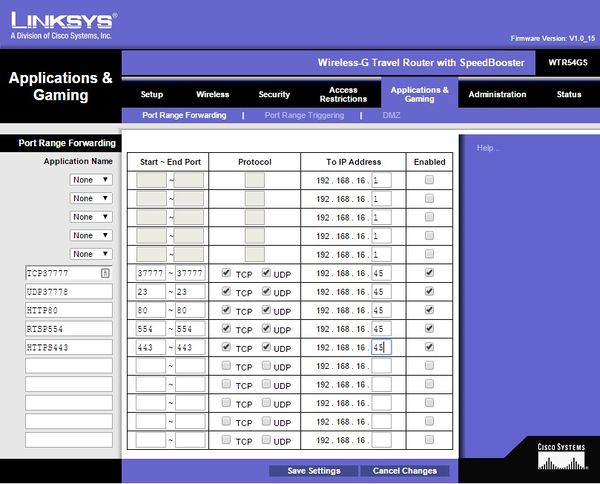
10. Create port forwarding rules for each port you wish to forward for the NVR. (Usually you will only need to forward the HTTP and the TCP port.)
Default Ports:
TCP: 37777
UDP: 37778
HTTP: 80
RTSP: 554
HTTPS: 443
11. The end result should look like the below image. We used a Cisco router for this example.
12. Hit, "Save" in the gateway interface, and open another tab.
13. Go to, "www.canyouseeme.org" and check that the ports you opened on the gateway.SOURCE: https://support.panoramasecurity.com.au/portal/en-gb/kb/articles/setting-up-port-forwarding-for-cctv-equipment#Overview
Setting up Port Forwarding for a Dahua NVR
Ports are usually closed in a router/modem to help prevent unauthorised access to a network. Opening ports on the router/modem may decrease the overall security of the network. This is an advanced article, If you aren't sure, contact an IT professional or lodge a ticket for further assistance.
NEVER leave the default or use a simple password on your NVR if you are utilising port forwarding
Overview
Port forwarding is a feature of network routers that allows specific communication ports to be directed to devices on an IP network, such as a computer, DVR, or IP camera. In the case of CCTV equipment, it allows the user to remotely view and control the equipment. Every router or modem is different, follow the step by step instructions and the instructions your manufacturers hardware to setup port forwarding, or try portforwad.com to search for your routers settings.
Prerequisites
- Network Video Recorder
- Connection to the internet
- Access to the router(s) and/or modem
- A computer that can access the network
Video Instructions
<iframe class="ql-video" frameborder="0" allowfullscreen="true" src="https://www.youtube.com/embed/8zO9K0Kob5k?" height="360" width="640"></iframe>
Step by Step Instructions
1. Login to your NVR via the Web Interface
2. Login with your credentials
If these are the default credentials, change them before activating port forwarding.
NEVER leave the default or use a simple password on your NVR if you are utilising port forwarding
3. Under, Main Menu -> Setup -> TCP/IP Change the IP Camera to, "Static" if the camera is currently set to, "DHCP" and make sure to add it to add it as a static IP on your router.
8. Open another tab and enter the, "Gateway" address listed under your NVR's Network settings. Example: 192.168.1.1, 192.168.0.1, 10.0.10.1
9. Login to your gateway and locate the, "Port Forwarding" section.
10. Create port forwarding rules for each port you wish to forward for the NVR. (Usually you will only need to forward the HTTP and the TCP port.)
Default Ports:
TCP: 37777
UDP: 37778
HTTP: 80
RTSP: 554
HTTPS: 443
11. The end result should look like the below image. We used a Cisco router for this example.
12. Hit, "Save" in the gateway interface, and open another tab.
13. Go to, "www.canyouseeme.org" and check that the ports you opened on the gateway.
More articles on CCTV